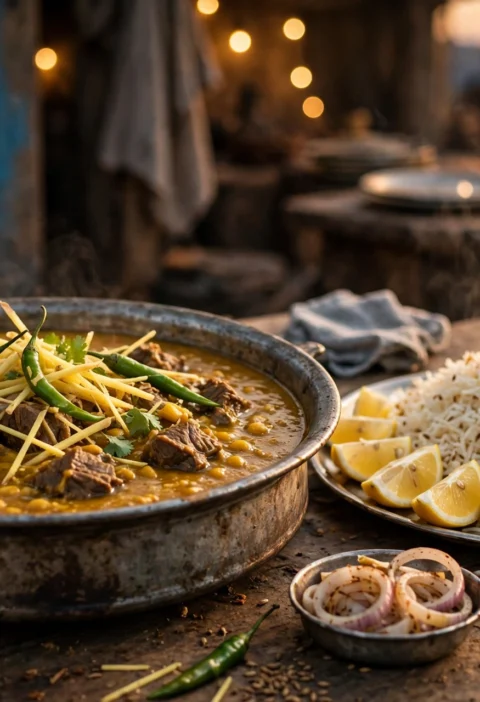
The first time I smelled real paya, I was half asleep. It was 4 a.m., a winter morning, and my uncle had driven us to a paya wala near Data Darbar whose deg had been simmering since midnight. The steam hit the cold air and smelled like marrow, garlic, and patience — everything a proper beef paya recipe should smell like. The man ladled out feet so tender the meat slid off the bone at the touch of a spoon, and the gravy — thick, golden, sticky enough to coat your lips — tasted like the whole animal had given everything it had. I’ve been chasing that bowl with this beef paya recipe ever since. We ate it with hot naans, squeezing lemon over each spoonful, and nobody spoke for the first five minutes. This beef paya recipe is that morning, rebuilt in my kitchen.
What makes paya different from every other curry is time and collagen. Trotters are mostly bone, tendon, and connective tissue — unpromising raw ingredients that transform after six or seven hours of slow simmering into something rich and gelatinous that no shortcut can fake. My first attempts failed because I rushed it: three hours on a high flame gave me tough meat in thin, greasy broth. The fix was embarrassingly simple — a heavy pot, the lowest possible flame, and leaving it alone overnight. Once you understand that this beef paya recipe is really a waiting recipe, the rest is just seasoning.
Why This Beef Paya Recipe Works
Paya fails when the meat is tough, the gravy is thin and greasy, or there’s a lingering smell that puts everyone off. This beef paya recipe solves all three:
- Seven hours on the lowest flame, no shortcuts. Collagen needs long, gentle heat to dissolve into gelatin — that’s what gives paya its signature sticky, lip-coating gravy. A pressure cooker gets you tender meat in an hour, but the gravy never develops the same body. This beef paya recipe treats time as an ingredient: simmer overnight and the trotters practically melt.
- The trotters are cleaned properly first. Any smell comes from residue on the feet, not from the dish itself. Scrubbing with salt and vinegar, then a quick blanch and rinse, removes everything that causes off flavors. Clean trotters mean a clean, rich broth — this beef paya recipe starts with that prep because there’s no fixing a bad-smelling pot later.
- Whole spices go in a muslin bag. You want the depth of black cardamom, cinnamon, and bay without fishing woody bits out of a sticky gravy at serving time. A little spice pouch gives you all the flavor and none of the debris. It also makes the final gravy silky-smooth, which is half the luxury of paya.
- Onions are browned deeply, not just softened. Two onions cooked to a true deep brown — past golden, almost caramelized — build the gravy’s color and sweetness. Pale onions make pale, flat gravy. The browning takes a solid 15 minutes, but it gives this beef paya recipe its gorgeous golden-brown base.
- Lemon and ginger go on at the table, not in the pot. The bright, sharp finish that cuts through all that richness comes from fresh lemon juice and raw ginger juliennes added per bowl. Cooking them in would dull everything. The contrast between the deep, slow gravy and the fresh, punchy garnish is what makes paya taste alive instead of heavy.
Ingredients
Serves 6 (paya is rich — portions run small)
For the trotters:
- 2 kg (about 4.4 lbs) beef trotters (paya), cut into 3-4 inch pieces
- 1/4 cup white vinegar, for cleaning
- 2 tablespoons salt, for cleaning
For the gravy:
- 1/2 cup (120 ml) neutral oil or ghee
- 2 large onions (about 400g), thinly sliced
- 2 tablespoons ginger-garlic paste
- 2 large tomatoes (about 300g), chopped
- 1 tablespoon red chili powder
- 1 teaspoon turmeric powder (haldi)
- 1 1/2 tablespoons coriander powder (dhaniya)
- 1 teaspoon cumin powder (zeera)
- 1 1/2 teaspoons salt, plus more to taste
- 1 teaspoon garam masala
Whole spices (in a muslin bag):
- 2 black cardamom pods
- 4 green cardamom pods
- 2-inch cinnamon stick
- 2 bay leaves
- 1 teaspoon whole black peppercorns
- 4 cloves
For serving:
- 2-inch fresh ginger, cut into thin juliennes
- 4 green chilies, sliced
- 2 lemons, cut into wedges
- Fresh coriander leaves, chopped
- Hot tandoori naan or kulchas
A note on the trotters: ask your butcher for hind trotters — they’re meatier than front ones and give you more to eat. Trotters are the feet of the animal, prized in many cuisines for their collagen content, which is exactly what makes this beef paya recipe work. The pieces should be cut small enough to fit comfortably in your pot, roughly 3-4 inches. If they arrive with any hair or rough skin, singe it off over an open flame before the vinegar scrub. Good trotters are the entire foundation of this beef paya recipe, so don’t accept scraps.
How to Make This Beef Paya Recipe – Step by Step
Step 1: Clean the trotters thoroughly.
Rub the trotter pieces all over with the salt and vinegar and let them sit for 20 minutes — this loosens any residue and starts neutralizing odors. Rinse under cold running water, scrubbing with your hands. Then put them in a large pot, cover with water, bring to a rolling boil for 10 minutes, and drain completely. Rinse the pieces again under cold water. This two-stage cleaning is non-negotiable for this beef paya recipe; skip it and the broth will carry a smell no amount of spice can hide. Your pot should be washed too before you continue.
Step 2: Brown the onions deep.
Heat the oil in your heaviest, largest pot over medium-high heat. Tip in the sliced onions and let them fry, turning them regularly, for a good 12 to 15 minutes until they reach a rich mahogany brown — deeper than most curries call for. This is deliberate caramelization, not burning, and it’s what gives the gravy its dark, savory backbone. Add the ginger-garlic paste and fry 2 minutes until the raw smell disappears. Then add the tomatoes, red chili powder, turmeric, coriander, cumin, and salt. Cook 8-10 minutes, stirring, until the tomatoes break down and the oil separates at the edges.
Step 3: Add trotters, water, and the spice bag.
Add the cleaned trotter pieces to the masala and turn them until every piece is coated in the browned onion mixture — take a full 3-4 minutes for this; the searing adds another layer of flavor. Pour in enough water to cover everything by 3 inches (about 10-12 cups). Drop in the muslin spice bag. Bring to a boil over high heat, skimming off any foam that rises in the first 15 minutes — this keeps the final gravy clear and clean-tasting.
Step 4: Simmer low and slow for 7 hours.
Once boiling, reduce to the absolute lowest flame your stove allows — you want the laziest possible simmer, a bubble every few seconds, not a rolling boil. Cover with the lid slightly ajar and walk away. Check every 90 minutes or so, topping up with hot water if the level drops below the trotters. At hour 5, the meat will start loosening; by hour 7, it should slide off the bone and the gravy should coat a spoon thickly. If the gravy is still thin at the end, remove the lid and simmer 30 minutes more to reduce. Fish out the spice bag and discard it.
Step 5: Finish with garam masala and rest.
Stir in the garam masala and taste for salt — paya needs confident seasoning, so don’t be shy. The gravy should be glossy, golden-brown, and sticky enough that it clings to the spoon. Turn off the heat and rest 15 minutes with the lid on; the flavors settle and the fat rises slightly, which you can spoon off if you like (or leave — it’s flavor). Serve in deep bowls with the ginger juliennes, green chilies, coriander, and lemon wedges alongside, plus the hottest naan you can find. Squeeze lemon over each spoonful at the table — that bright hit against the deep, slow gravy is what makes this beef paya recipe unforgettable.
Serving Suggestions
Paya is breakfast food in the old Lahore tradition — eaten at dawn with kulcha or naan, strong doodh patti alongside, the day’s first and richest meal. That’s how this beef paya recipe is meant to be enjoyed: early, hot, and unhurried. The classic pairing is simple: hot tandoori naan for scooping, and nothing else competing on the plate. The lemon wedges and ginger aren’t optional garnish; they’re the bright counterpoint that keeps each bite from getting too heavy.
For a full winter dawat, serve this beef paya recipe as the opening course before my beef nihari — the two slow-cooked classics side by side is a combination that defines cold-weather feasting. And if anyone wants something lighter afterward, my daal tadka makes a gentle landing after all that richness.
Storage and Reheating
Paya is one of those dishes that improves overnight — the gelatin sets, the flavors marry, and the next day’s bowl is somehow deeper than the first. Refrigerate in an airtight container for up to 4 days; the gravy will turn to jelly in the fridge, which is exactly right — that’s the collagen, and it’s the sign of a proper paya. To reheat, warm gently in a heavy pot over low heat, stirring, until it loosens back into gravy; add a splash of hot water if it’s too thick. Never microwave it — uneven heating makes the meat tough. It also freezes beautifully for up to 3 months; thaw overnight in the fridge before reheating. A frozen batch of this beef paya recipe is one of the best things you can have waiting in your freezer on a cold week. According to Wikipedia’s article on paya, this slow-cooked trotter dish is a beloved traditional breakfast across South Asia, and the gelatin-rich broth is prized as nourishing winter food.
Frequently Asked Questions
My paya smells bad while cooking. Is it ruined?
Probably not — but it means the cleaning step was rushed. A faint smell in the first hour is normal and cooks off; a strong, persistent smell means residue was left on the trotters. Next time, be more aggressive with the salt-vinegar scrub and the blanching step. For this batch, add an extra inch of ginger to the pot and make sure you’re skimming the foam — both help. This beef paya recipe’s cleaning protocol exists precisely because there’s no rescue once a bad smell sets in deep.
Can I use a pressure cooker to speed it up?
You can get tender meat in about 45 minutes at pressure, but the gravy won’t be the same — pressure cooking doesn’t develop the slow-rendered gelatin body that defines paya. If you must, pressure cook the trotters with the masala for 40 minutes, then simmer uncovered for another hour to reduce and thicken. It’ll be good, just not transcendent. The 7-hour version of this beef paya recipe is worth planning for.
Why is my gravy thin and greasy instead of thick and sticky?
Two causes: not enough time, or too much water. Getting the gravy right is the whole point of this beef paya recipe, so don’t rush this part. The thickness comes from dissolved collagen, which needs the full 7 hours, and from reduction — if you kept topping up with cold water, you diluted it. Use hot water for top-ups, keep the simmer truly lazy, and give the final 30 minutes uncovered if needed. The gravy should coat a spoon and your lips; if it runs like broth, it needs more time.
What’s the difference between paya and nihari?
Both are slow-cooked beef classics, but paya is made from trotters (feet) and nihari from shank meat — so paya’s gravy is more gelatinous and sticky, while nihari’s is smoother and more spice-forward. Paya is traditionally a breakfast dish; nihari works any time. They’re cousins, not twins, and this beef paya recipe celebrates what makes paya distinct: that lip-coating, collagen-rich body you can’t get from any other cut.
Recipe Summary
- Prep time: 30 minutes (cleaning + masala)
- Cook time: 7 hours
- Total time: 7 hours 30 minutes
- Servings: 6
- Cuisine: Pakistani
- Course: Main (Breakfast)