Sunday afternoons at home had a smell, and it was garlic. Ami would spread a newspaper across the kitchen table, tip out a kilo of garlic and a mound of ginger, and we would all be conscripted — peeling, chatting, complaining, listening to the radio — until two steel bowls stood full and the blender came out. That weekly ritual is where this ginger garlic paste recipe comes from. It was never written on paper, because it never needed to be: equal parts of the two roots, a pinch of salt, a spoon of oil, done. Every curry of the week began from that jar.
When I moved into my own place, I skipped the ritual and bought the jarred paste from the supermarket, and my cooking quietly flattened. Jarred paste tastes tired and faintly sour, and for months I blamed my spices before I understood why: the commercial jars are preserved with vinegar and citric acid, and acid does to fresh aromatics what it does to a cut apple — it pickles the life out of them. My first homemade batch had the opposite problem. I blended it with water, skipped the salt and oil, and within four days the jar had turned an alarming green and tasted bitter. This ginger garlic paste recipe keeps ami’s proportions and fixes the keeping part, so one Sunday batch lasts the whole month.
Why This Ginger Garlic Paste Recipe Works
A paste is only two ingredients, so there is nowhere for mistakes to hide. This ginger garlic paste recipe works because every small choice protects the same thing — the raw, pungent freshness that makes the paste worth making at all:
- The ratio is 50:50 by weight, not by eye. Ginger is fluffy and light; garlic is dense. A cup of each gives you far more garlic than ginger, and the paste leans harsh. Weighed equal, the two balance — ginger’s bright heat up front, garlic’s deep savor underneath — and neither bullies the other in the pan. Ami’s scale was her palm, but a cheap kitchen scale makes this ginger garlic paste recipe exact every time.
- No water goes into the blender. Water is what jarred brands and hurried cooks add to make blending easier, and it is also what shortens the paste’s life and dilutes its punch. A spoonful of oil does the same mechanical job — helping the blades catch — while protecting the paste instead of watering it down.
- Salt and an oil cap guard the surface. Salt seasons the paste and slows spoilage; a thin film of oil poured over the top seals the surface away from air. Air is the real enemy — oxidation is what dulls the color, turns stray jars green at the edges, and flattens the flavor. Seal it out and a homemade ginger garlic paste recipe keeps its character for weeks.
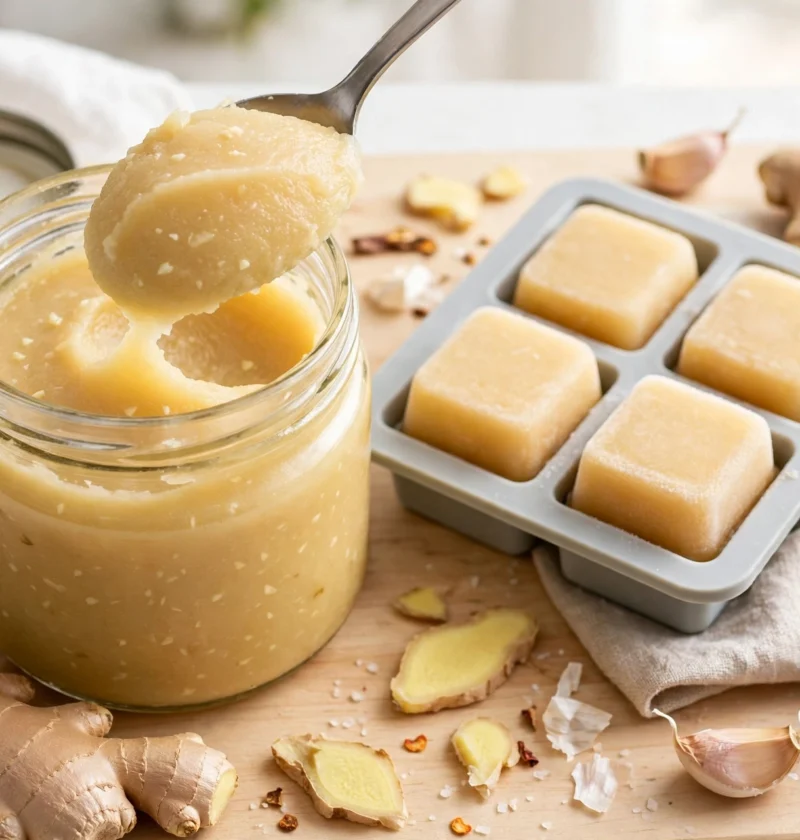
- Freezing in cubes keeps it fresh for months. A big batch divided into ice-cube trays becomes a drawer full of pre-measured tablespoons, each as pungent as the day it was blended. Frozen cubes drop straight into hot oil, no thawing, no waste — the system that makes this ginger garlic paste recipe a month of weeknight cooking insurance.
- Fresh paste fries differently than jarred. Because there is no acid in it, homemade paste browns properly in hot oil and releases that sweet, roasted base note every desi curry is built on. Jarred paste, carrying its vinegar with it, steams and stays sharp. Once you taste the difference in a simple daal, the supermarket jar loses its shelf space permanently.
Ingredients
Makes about 2 cups of paste (roughly 32 tablespoons)
The paste:
- 9 oz (250g) fresh ginger — about 2 large, plump hands — peeled and roughly chopped
- 9 oz (250g) garlic cloves — about 10-12 whole heads — peeled
- 1 teaspoon fine salt
- 1 tablespoon neutral oil, plus 1-2 teaspoons more for the top of the jar
Optional, family variations:
- 1/4 teaspoon turmeric powder — some households add it for color and keeping quality
- 1-2 green chilies, for a marinade batch with built-in heat
It is worth knowing what you are blending. Ginger brings gingerol, the compound behind its warm bite, and it is at its strongest in firm, heavy roots whose skin is thin and shiny — wrinkles mean the fire has gone out of it. Garlic hides its power until the clove is crushed, when enzymes create the allicin that gives raw garlic its famous sting. Blend the two fresh, as this ginger garlic paste recipe does, and you capture both compounds at their peak instead of buying them pre-faded in a jar.
How to Make This Ginger Garlic Paste Recipe – Step by Step
Step 1: Peel everything the easy way.
Scrape the ginger’s skin off with the edge of a teaspoon — it follows the knobbly curves and wastes almost nothing, unlike a peeler. For the garlic, lay each clove under the flat of a knife, press once with your palm until it cracks, and the skin slips off; a bowl of warm water and ten minutes of soaking loosens stubborn skins. This is the slow step of any ginger garlic paste recipe, and it is exactly why ami turned it into a family gathering.
Step 2: Chop roughly and check the balance.
Cut the ginger into small chunks — long fibers clog blender blades, and cross-cutting them first keeps the paste smooth. Weigh the chopped ginger and the peeled garlic, or at least compare them in two identical bowls, and adjust until they match. Equal weight is the entire flavor contract of this ginger garlic paste recipe, so it is worth the ten seconds.
Step 3: Blend in batches, with oil — never water.
Add half the ginger and garlic to the blender with half the salt and a teaspoon of the oil. Blend in short pulses, stopping to scrape the sides down and press the mixture toward the blades, until it runs smooth and pale gold. If the blades spin uselessly, add oil a teaspoon at a time — patience and the tamper do the rest. Repeat with the second batch and stir the two together in a bowl so the whole quantity is uniform.
Step 4: Jar the fridge portion and cap it with oil.
Spoon about a third of the paste into a small, clean, dry glass jar — a week’s worth plus a margin. Smooth the surface flat with the back of a spoon, then pour a teaspoon of oil over the top and tilt the jar so the oil coats every bit of the surface. Lid it and refrigerate. That glistening cap is the difference between a jar of this ginger garlic paste recipe that stays bright for two weeks and one that dulls by Friday.
Step 5: Freeze the rest in ice-cube trays.
Spoon the remaining paste into standard ice-cube trays, one heaped tablespoon per well, and level them off. Freeze solid, about 4 to 6 hours, then pop the cubes out into a labeled freezer bag with the air pressed out. Each cube is one tablespoon — the exact amount most curries call for — so future you never has to chop, measure, or think. This ginger garlic paste recipe now has you covered for a month of dinners.
Serving Suggestions
Use a tablespoon anywhere a recipe says “ginger-garlic paste” — which, in a Pakistani kitchen, is nearly everywhere. It is the first thing into the oil after the onions in my chicken karahi, the base that the tomatoes and green chilies build on, and a frozen cube dropped straight into the hot karahi melts in seconds. Rubbed over chicken with yogurt, lemon, and spices, it becomes the marinade that makes my chicken tikka taste like it came off a charcoal grill rather than out of an oven.
A good ginger garlic paste recipe earns its keep beyond curries, too. A teaspoon whisked into the marinade for kababs keeps the meat fragrant all the way through; a cube melted into a simple daal tadka gives the lentils a backbone that powder alone never manages; and a spoonful stirred into plain rice with peas and cumin is a respectable emergency dinner. Keep the cubes where you can see them in the freezer door, because a ginger garlic paste recipe only helps the cook who remembers it exists.
Storage and Reheating
No reheating applies to a paste, but storage is the whole craft here. The fridge jar keeps well for up to 2 weeks with its oil cap intact — always take paste out with a clean, dry spoon, and re-smooth and re-cap the surface if you disturb it. The frozen cubes from this ginger garlic paste recipe hold their quality for 3 months, and remain usable for up to 6. Drop cubes directly into hot oil or a simmering gravy from frozen; they melt in under a minute and need no thawing. Discard any paste that smells sour, fizzes, or grows mold — trust your nose over the calendar. Stored this way, a single batch of this ginger garlic paste recipe outlasts three supermarket jars and tastes better than all of them.
Frequently Asked Questions
Why did my homemade paste turn green?
Garlic goes green or blue-green when its sulfur compounds meet acid or trace minerals — the same reaction that colors pickled garlic. It looks alarming but a fresh, properly refrigerated batch is still safe; the flavor, though, drifts bitter. Prevention is built into this ginger garlic paste recipe: no lemon or vinegar anywhere near the blender, an oil cap on the jar, and cold storage from the start.
Can I change the ratio — more ginger, or more garlic?
Of course; 50:50 is the all-purpose balance, not a law. Cooks who make a lot of marinades often run 60:40 toward ginger, which reads brighter and gentler, while garlic-heavy 40:60 batches suit rich meat curries. Make the standard version of this ginger garlic paste recipe first, then tune the next batch to your own table.
My blender will not puree without liquid. What do I do?
Work in smaller batches so the mixture stays in contact with the blades, pulse rather than running continuously, and add the oil a teaspoon at a time — it counts as your blending liquid. A food processor handles the job more forgivingly than a tall blender. What you must not do is reach for water; that single shortcut is what shortens the paste’s life to days.
Is it really better than the store-bought jar?
Taste them side by side in the same daal and decide in one bite. The jar is preserved with acid, often months old, and its flavor is flat and faintly pickled; the homemade version is pungent, sweet when fried, and unmistakably alive. Fifteen minutes of blending buys you a month of the real thing — the arithmetic of this ginger garlic paste recipe is hard to argue with.
Recipe Summary
- Prep time: 20 minutes
- Cook time: 0 minutes
- Total time: About 20 minutes
- Yield: About 2 cups
- Cuisine: Pakistani
- Course: Kitchen Basics / Prep