The Rainy-Day Snack I Still Chase
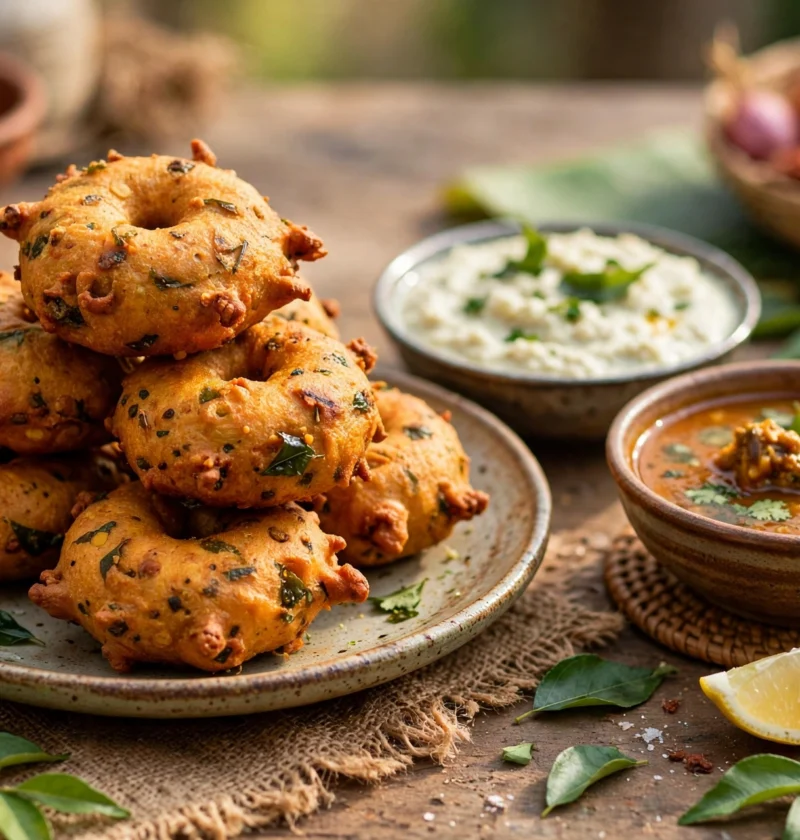
The first masala vada I ever tasted came from a tiny tea stall in Madurai, on an afternoon when the rain was coming down so hard the street had turned into a shallow river. I was sixteen, on a family trip, and we had ducked under the stall’s tin roof just to stay dry. The man behind the counter slid a newspaper cone across to us without asking — four dark-golden discs, still crackling from the oil, with a smear of white coconut chutney on the side. I bit into one standing up, rain dripping off my elbows, and the crunch was so loud I actually laughed. That was years ago, and I have been chasing that exact crunch ever since. This masala vada recipe is the version that finally gets me there, made in my own kitchen with a bag of chana dal and a bunch of dill.
If you have never made them, masala vada are South India’s answer to the fritter: patties of soaked chana dal ground coarse, mixed with onion, curry leaves, dill and fennel, then fried until the edges turn almost lacy. There is no potato and no flour holding them together — the dal does all the work. This masala vada recipe takes about forty-five minutes of active time once the dal has soaked, and the vadas disappear faster than any snack I know. Serve them hot with chutney and filter coffee, and you will understand why every tea stall in Tamil Nadu keeps a tray of them under a glass dome.
Why This Masala Vada Recipe Works
- The grind stays coarse, never smooth: The dal must be ground to something like wet sand, with visible bits all through it. Those uneven pieces are what fry up into craggy, crunchy edges — blend it to a paste and you get a soft pakora instead of a vada, and this masala vada recipe lives or dies on that texture.
- The dal is soaked, not cooked: Soaking raw dal and grinding it raw gives the finished vada a nutty, almost meaty bite. If you boiled the dal first, the whole batch would turn to mush long before it ever met the oil.
- Fennel and dill do the talking: A spoon of fennel seeds and a handful of fresh dill give this masala vada recipe its unmistakable smell — warm, grassy, faintly sweet. Leave them out and the vadas taste flat, however well you fry them.
- A short rest firms the batter: Fifteen minutes of resting lets the ground dal drink up the onion’s moisture and stiffen just enough to hold a shape. Skip the rest and the patties slump in the pan before they ever crisp.
- Hot oil and small batches: Frying at 350°F, five or six vadas at a time, keeps the oil hot and the crust crisp. Crowd the pan and the temperature drops, and you end up with oily, pale discs instead of golden ones.
Ingredients for This Masala Vada Recipe
Everything below makes about sixteen vadas, enough for four people as a snack or six as part of a bigger spread. Soak the dal in the morning and the rest of this masala vada recipe moves quickly — most of the waiting is just the oil coming up to temperature.
For the vadas
- 1 1/2 cups chana dal (split chickpeas), soaked for 3 to 4 hours
- 3 dried red chillies, stems removed
- 1 tablespoon fresh ginger, roughly chopped
- 1 teaspoon fennel seeds
- 1/4 teaspoon asafoetida (hing)
- 1 medium onion, finely chopped (about 1 cup)
- 2 green chillies, finely chopped
- 2 sprigs fresh curry leaves (about 20 leaves), finely chopped
- 1/4 cup fresh dill leaves, chopped
- 3/4 teaspoon fine sea salt, plus more to taste
- About 3 cups neutral oil, for deep-frying
For serving
- Coconut chutney, for dipping
- Lemon wedges, for squeezing over
How to Make This Masala Vada Recipe in 5 Steps
The method is five stages, and the only real rule is patience with the grinding: stop the blender the moment the dal looks like coarse crumbs, not a batter. From there it is shaping and frying, and this masala vada recipe rewards a cook who does not rush the first step.
Step 1: Soak and drain the dal
Rinse the chana dal in several changes of water until the water runs mostly clear, then cover it with about 3 inches of fresh water and leave it to soak for 3 to 4 hours. The dal is ready when a grain crushes easily between your fingers. Drain it in a colander for a good 10 minutes, shaking it now and then, so it is as dry as you can get it — water left clinging to the dal is the main reason batters turn loose. Before grinding, scoop out 2 tablespoons of the whole soaked dal and set them aside; stirred back in later, they give this masala vada recipe its best surprise, little nuggets of bite inside the crunch.
Step 2: Grind it coarse, in batches
Tip the drained dal into a blender or food processor in two batches, along with the dried red chillies, ginger, fennel seeds and asafoetida. Pulse in short bursts, scraping the sides down between bursts, and stop the moment the mixture looks like damp breadcrumbs with visible dal pieces still in it. Do not add water unless the blades absolutely refuse to turn, and then only a tablespoon at a time. If the mixture turns smooth, do not throw it away — it will still taste good — but know it will fry up soft like a pakora rather than craggy like a vada, and next time stop the blender sooner.
Step 3: Mix and rest the batter
Scrape the ground dal into a bowl and add the onion, green chillies, curry leaves, dill, salt and the reserved whole dal. Mix it all with your hands until it comes together into a soft, slightly sticky mass. Cover the bowl and rest the batter for 15 minutes. This rest matters more than it looks: the ground dal absorbs the onion’s juices and stiffens just enough to shape cleanly. After resting, the batter should hold a ball in your palm without slumping flat. If it still feels slack, a tablespoon of rice flour will steady it without changing the flavour of this masala vada recipe.
Step 4: Shape the vadas
Wet your palms lightly — the batter will try to stick to dry hands — and roll out portions about the size of a golf ball. Flatten each one into a round about two and a half inches wide and half an inch thick, pressing the edges smooth so no loose bits stick out to break off in the oil. Unlike its cousin the medu vada, this masala vada recipe needs no hole in the middle; the flat disc shape is what gives it the maximum crunchy edge. Set the shaped vadas on a greased plate in a single layer while the oil heats, and keep your hands wet as you go.
Step 5: Fry until deep golden
Pour the oil into a heavy kadai or deep pan and heat it to 350°F. Test it with a crumb of batter: it should sizzle at once and rise to the surface within a few seconds. Slide in five or six vadas gently, and leave them alone for the first minute so the crust sets. Then turn them now and then and fry for 4 to 5 minutes, until they are a deep golden brown and the sound in the pan changes from an angry hiss to a dry crackle. Lift them onto a wire rack, not paper towels — paper traps steam and softens the very crust you worked for. Fry the rest the same way, letting the oil come back to 350°F between batches, and serve this masala vada recipe hot, while the crust still crackles.
Serving Suggestions
The classic way is the simplest: a pile of hot vadas with coconut chutney and a small bowl of Sambar for dunking, plus filter coffee or masala chai on the side. A squeeze of lemon over the top wakes up the fennel and dill beautifully. That is how I serve this masala vada recipe most often, and it needs nothing else — the snack is the whole occasion.
For a bigger spread, set these beside my Medu Vada so guests can compare the two great South Indian vadas side by side — one soft and doughnut-like, one shatteringly crisp. They also make wonderful sliders tucked into soft mini rolls with chutney and a few onion rings, which is how I stretch a batch of this masala vada recipe when unexpected guests show up at tea time.
Storage and Reheating
Leftover vadas keep in an airtight box in the fridge for 3 days, though they will lose their crackle — that is normal, and the flavour stays excellent. To bring them back, heat them on a wire rack in a 375°F oven for eight to ten minutes until crisp again, or use an air fryer set to 350°F for three to four minutes. The microwave is the one method I avoid for this masala vada recipe, because it steams the crust soft in under a minute. For longer storage, freeze the shaped but uncooked patties from this masala vada recipe on a tray until solid, then bag them for up to a month; fry straight from frozen, adding a minute or two to the cooking time.
Frequently Asked Questions
Can I make this masala vada recipe without onion?
Yes, and the vadas still turn out well. Leave the onion out entirely and add an extra sprig of chopped curry leaves plus a pinch more fennel to carry the flavour. The batter will be a little drier without the onion’s moisture, so add a tablespoon of water if it will not hold together. This onion-free version is also the one I make when friends who avoid onion and garlic come for tea.
Why did my vadas fall apart in the oil?
Almost always one of three things: the dal was not drained well enough, the grind went too fine, or the oil was not hot enough when the vadas went in. A wet, smooth batter has nothing to grip with, and cool oil soaks into it instead of sealing it. Next time you make this masala vada recipe, drain the dal for the full 10 minutes, stop the blender while the mixture is still crumbly, check the oil with a thermometer or the crumb test, and do not nudge the vadas until the crust has set.
Can I bake or air-fry them instead of deep-frying?
You can, though the result will differ. Brush the shaped vadas generously with oil and bake them in a 400°F oven for twenty to twenty-two minutes, turning once, or air-fry at 375°F for twelve to fourteen minutes. They come out golden and tasty, and a good option for a weeknight, but they will not have the shattering crust that deep-frying gives — that crust needs the full embrace of hot oil. If you bake them, eat them straight from the oven, as they soften faster than fried ones.
Can I use a different dal?
Half chana dal and half toor dal works nicely and fries up a touch lighter, though a little less nutty. I would not use masoor dal — it turns soft and the vadas lose their bite — and whole chickpeas need a much longer soak and give a heavier, denser vada. Chana dal is the classic here for a reason: it holds its shape, grinds coarse without turning to paste, and brings the nutty flavour this masala vada recipe is built on.
Recipe Summary
Count on 3 hours of soaking that mostly takes care of itself, then about 45 minutes of active cooking, which puts this masala vada recipe on the table as a snack for four. A serving of four vadas with chutney lands near 290 calories.
If you make a batch this weekend, fry one extra and eat it standing in the kitchen, straight off the rack — that first crackling bite is the cook’s reward, and it is the reason this masala vada recipe has stayed in my rotation for years. For more background on the fritter family, read about vada on Wikipedia, and about the curry tree whose leaves give these vadas their fragrance.