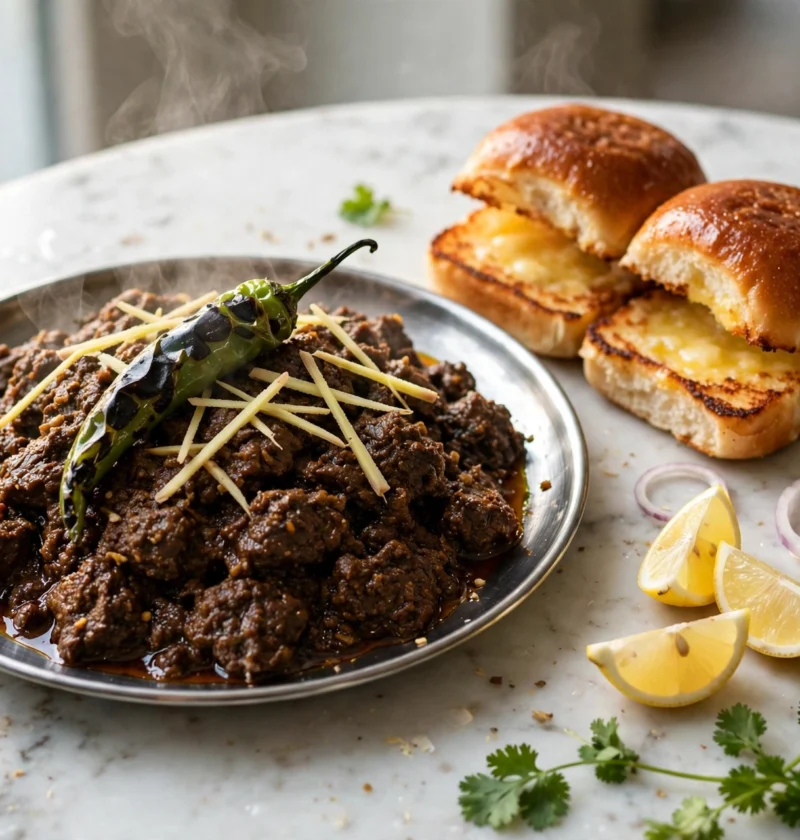
The first time I had a proper keema pav, it was breakfast, and I was not dressed for the occasion. I had wandered into one of those old Irani cafés in Mumbai — marble-topped tables, a ceiling fan doing its slow best, the day’s menu chalked on a board by the till — and ordered whatever the man at the next table was eating, because his plate looked like it knew something mine didn’t. What arrived on the steel plate changed my understanding of mince forever: a dark, peppery heap of keema, almost dry, shining with fat, and beside it two split pav buns so glossy with butter they caught the light. No spoon was offered. None was needed. This keema pav recipe is the one I have been chasing in my own kitchen ever since that morning.
Keema pav belongs to Mumbai’s Irani cafés, and I won’t pretend otherwise — but Karachi understood it on sight. Our bun kabab carts have always believed that bread is not a side dish, it is the utensil, and this is the same faith in a different accent. The keema here is not a home-style curry: it is drier, bolder, more peppery, built to be scooped, pressed and dragged through with pieces of buttered pav rather than ladled over rice. If your family’s keema swims a little, in a friendly tomato gravy, that is a fine and different pleasure. This one stands up on the plate and asks for bread.
Why This Keema Pav Recipe Works
A café keema succeeds or fails on texture, and texture here is a handful of small disciplines rather than any secret spice. Get these five right and the plate tastes like it came off a marble-topped table:
- The keema finishes dry — on purpose. Every drop of water the mince releases gets cooked away until the fat separates and glistens at the edges. That concentrated, almost-fried finish is the whole café signature; a wet keema pav is just curry that met a bun.
- The onions brown before the meat arrives. Deep golden onions are the sweetness underneath all that pepper. Rushed, pale onions leave the dish tasting raw and sharp no matter how long the mince cooks afterward.
- The mince sears undisturbed, then gets broken up. Spread it flat, leave it alone for two minutes, and it catches real colour on the pan. Stir it from the first second and it stews grey in its own juices instead.
- The heat is pepper-forward, not just chili-hot. Coarsely crushed black pepper and green chilies give the café keema its particular slow warmth, while garam masala goes in at the end so its aroma survives to the plate.
- The pav is treated as half the dish. Split, buttered without apology, and toasted until the cut sides are golden and crisp at the edges while the middle stays soft enough to soak up the keema’s fat.
Ingredients for This Keema Pav Recipe
Two things carry this plate, and both deserve a sentence before we cook. Keema is simply the subcontinent’s word for minced meat, and every region guards its own build — this one wants beef, a proper fat content, and no gravy to hide behind. The pav is the soft, squarish bread roll Mumbai’s bakeries sell as ladi pav, baked joined in rows so each bun tears away with pillowy sides; if you are abroad and cannot find it, the FAQs below have honest substitutes that work beautifully. Everything else — onion, tomato, ginger, chili — is ordinary café pantry stock, and that ordinariness is the point.
For the keema
- 1 1/2 pounds (680 g) ground beef, 80/20 (not lean — see the FAQs)
- 2 tablespoons ghee (or a neutral oil)
- 2 medium onions, finely chopped (about 10 ounces / 285 g)
- 1 tablespoon ginger-garlic paste
- 2 medium ripe tomatoes (about 10 ounces / 285 g), finely chopped
- 3 to 4 fresh green chilies, finely chopped, plus more to taste
- 1/2 teaspoon ground turmeric
- 1 teaspoon red chili powder
- 1 teaspoon ground coriander
- 1 teaspoon coarsely crushed black pepper, plus a final pinch
- 1 teaspoon fine sea salt, or to taste
- 1/2 teaspoon garam masala
- 2 tablespoons chopped fresh cilantro
- 1 teaspoon julienned fresh ginger, to finish
For the pav and serving
- 8 ladi pav buns (2 per person)
- 3 to 4 tablespoons softened butter, for toasting — be generous
- 1 lemon, cut into wedges
- 1 small red onion, separated into thin rings
- 4 whole green chilies, blistered in a teaspoon of hot oil
- Extra cilantro leaves, to scatter
How to Make This Keema Pav Recipe – Step by Step
Step 1: Brown the onions until they are honestly golden. Warm the ghee in a wide, heavy pan or karahi over medium heat and add the chopped onions with a pinch of the salt. Cook them patiently, stirring now and then, a good ten to twelve minutes, until the colour deepens to an even, burnished gold — think strong chai, not pale straw. This base is where the dish’s sweetness lives, and there is no shortcut that survives to the plate.
Step 2: Sear the mince flat, then break it up. Raise the heat to high and add the ground beef in one layer, pressing it down like a giant patty. Leave it completely alone for 2 minutes so the underside browns, then break it into small, coarse crumbs with the edge of your spoon. Keep the heat high and let the mince fry in its own fat, stirring only occasionally, until the panful of liquid it releases has mostly bubbled away — about 6 to 8 minutes.
Step 3: Bhunao the masala right into the meat. Stir in the ginger-garlic paste and fry for a minute, until the raw smell goes. Add the tomatoes, red chili powder, coriander, turmeric, crushed black pepper and the remaining salt, and cook — bhunao, properly, scraping the bottom — for 6 to 8 minutes, until the tomatoes have melted into the mince, the mixture looks dark and cohesive, and beads of fat glisten around the edges of the pan. If a spoon drawn through it leaves a trail that stays dry, you are there.
Step 4: Finish it peppery and bright. Stir in the chopped green chilies and the garam masala and cook one final minute — the chilies should stay vivid, the garam masala fragrant rather than cooked out. Take the pan off the heat, shower over the cilantro, ginger juliennes and one last pinch of crushed pepper, and let the keema rest while you deal with the bread. It will taste even more itself in five minutes.
Step 5: Butter-toast the pav and serve it heaped. Split each pav without cutting all the way through, butter the cut sides generously, and toast them butter-side down in a hot skillet until golden and crisp at the edges, about a minute per batch. Pile the pav onto plates, heap the hot keema beside and partly over them, and crown each serving with onion rings, a blistered green chili and a lemon wedge. To the table immediately — this keema pav recipe waits for nobody, and the pav must still be warm when the first scoop happens.
Serving Suggestions
Eat it the café way: tear off a corner of pav, pinch up a mouthful of keema with it, drag it through any fat pooled on the plate, squeeze lemon over the whole business roughly every third bite. A glass of milky Irani-style chai is the classic partner, though on a Karachi evening I have served it with a sharp mint raita on the side and nobody complained. It is breakfast in Mumbai and a perfectly respectable dinner anywhere else.
It helps to know how this plate differs from its cousins on this site. My aloo keema matar is the home kitchen’s version of mince — potatoes and peas folded through a softer, wetter tomato gravy, made for rotis and rice and weeknight appetites. And my pav bhaji shares this recipe’s beloved bun and its butter budget, but the bhaji itself is a mashed-vegetable carnival — same pav, entirely different universe. This keema pav recipe is the third point of the triangle: dry, meaty, pepper-led, and eaten by hand.
Storage and Reheating
The keema keeps very well — arguably better on day two, once the pepper and garam masala have settled into it. Sealed tight, it sits happily in the fridge for 3 days and freezes well for up to 2 months; thaw it overnight before using. Bring it back in a wide pan set over medium heat, loosening it with a splash of water, and once it is steaming, let it sit undisturbed for a minute so the edges catch and crisp again — you are restoring that dry bhunao finish, not just warming it through. The pav, however, is a fresh-only affair: never assemble the plates ahead, and always toast the buns at serving time, because a buttered pav that has sat around goes leathery and sad, and no amount of keema can apologise for it.
Frequently Asked Questions
What fat percentage should the beef mince be — and do I drain it?
Use 80/20 if you can find it, 85/15 at the leanest. Fat is doing real work in this keema pav recipe: it keeps the crumbs juicy through a deliberately dry, high-heat cook, and it carries the pepper and spices. Lean mince — 93/7 and beyond — turns tight, dry and faintly rubbery no matter how carefully you cook it. On draining, honestly: cook the liquid off first, because that liquid is water, not fat. If, after the bhunao, a genuine pool of fat is sloshing around, tilt the pan and spoon off a tablespoon or two. Never rinse the mince, and never drain it before the sear — you would be pouring the flavour down the sink and guaranteeing grey meat.
I can’t buy ladi pav where I live. What actually works instead?
More than you’d think. Soft white dinner rolls are the closest everyday swap — same pillowy crumb, same tear-apart charm. Potato buns are excellent too, sturdy and faintly sweet. Brioche works but leans dessert-sweet and rich, so toast it a shade darker to balance it. Whatever you use, the method matters more than the brand: split the buns, butter the cut faces generously — a full, visible layer, not a scrape — then toast them butter-side down in a hot, dry skillet until the edges turn golden and crisp while the centre stays soft. That contrast, crisp rim against soft middle, is what makes a substitute taste like pav instead of toast.
Can I make this with chicken or turkey mince?
Yes, and cafés do serve a chicken version of this keema pav recipe, but manage it like the leaner meat it is. Poultry mince gives up its water faster and dries out sooner, so add an extra tablespoon of ghee or butter at the start, keep the bhunao shorter — closer to 5 minutes once the tomatoes go in — and pull it off the heat the moment the masala clings and the fat shows. Ground turkey thigh behaves better than breast for the same fat reasons as beef. Season a touch more boldly than you would the beef, because poultry mince is a quieter base, and lean on the lemon and green chili at the table. The texture will be finer and lighter; the ritual stays exactly the same.
Why did my keema release a flood of water and turn grey?
Three usual culprits, all fixable. First, crowding: mince piled deep in a small pan steams in its own juices instead of frying, so use the widest pan you own or cook in two batches. Second, a pan that was not properly hot when the meat went in — it should sizzle on contact, loudly. Third, salting too early: salt draws moisture to the surface, so season the onions lightly at the start if you like, but give the mince its real salt after the first sear. The rescue for a watery batch is patience, not panic — keep the heat high, spread the meat thin, and simply cook the liquid off completely before the tomatoes go in. Grey is a stage, not a verdict; the bhunao that follows will brown it back.
Recipe Summary
- Prep time: 15 minutes
- Cook time: 30 minutes
- Total time: About 45 minutes
- Servings: 4
- Cuisine: Pakistani
- Course: Main Course